Often times when creating rendered images for marketing or promotion purposes you’ll need to use a variety of tools to reach an end result. It would be great if you were able to simply set up something in PhotoView 360 or PhotoWorks, process the image and it would be complete but that is rarely the case. Most times I’m contracted to create the rendered image results of a SolidWorks model only. That image is then turned over to the marketing graphic designers where they use various tools to create a composite image for their specific needs. Most of the time marketing will dictate the specific view(s), colors, size, etc they will require and my work has to fit their specifications. On a recent project however I was provided a SolidWorks model and given complete freedom to create any image I wished. Fun! 😉
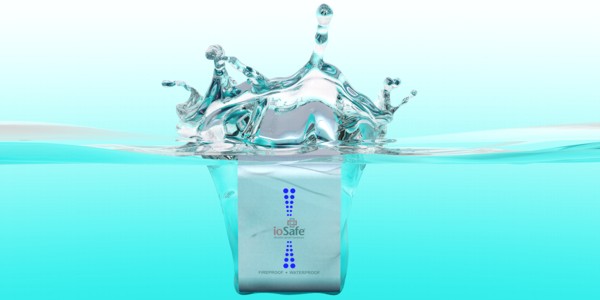
I was contracted to create an image for the ioSafe Solo product. Not only did the final image need to showcase the product but it had to be visually interesting as well. ioSafe markets their product as being waterproof and fireproof, what better way to create visual interest and promote product features than to incorporate some of this into the image. I had a visual in my head of what I wanted to create and I knew the tools available to me in SolidWorks would not be enough to achieve the idea. I knew I had to use software more suited to the task of advanced rendering and for this task I chose modo. The image at the top of this post is the final image I created. It’s the output which came directly from modo, no image retouching or post processing what so ever. Let’s a take a closer look at how I combined SolidWorks and modo to achieve the final results.
First I started in SolidWorks with the ioSafe Solo model. I’d like to point out the assembly file was saved as a surface part file so what I had to work with was a collection of surface bodies. This makes my job a little tougher because surface bodies do have some quirkiness when being used to create rendered images. I would have preferred the native SolidWorks file or an assembly file saved as a part file using solid bodies. I applied appearances and decals (painted the model) in SolidWorks since it’s easier to do this work there and then transfer that information to modo on file import.
I then imported the file into modo using the importer found in the soon to be released SolidWorks kit. The importer is essentially the same one used in PhotoView 360 and it does a decent job of converting the appearance and decal information. It’s not always 100% correct on the appearance and decal conversion but it’s fairly easy to clean up mistakes made during file import. I should point out I’m working with a beta version of the importer, the released version should have any kinks worked out of it. The surface geometry imported without issue.
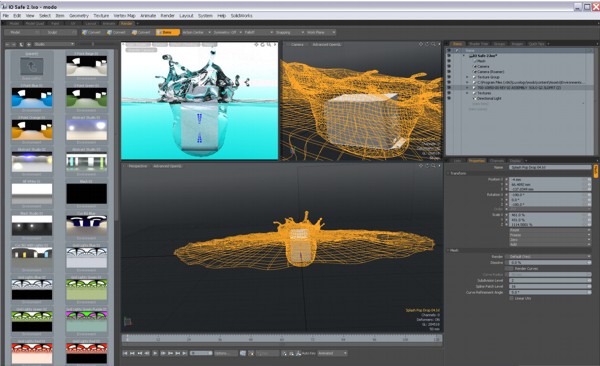
Next step was to add the water geometry to the modo scene and make the model on screen closer to the image in my head. This was really where the difficult part began and the reason why I chose to create this image using modo. Water, splashes, water drops are created using a more organic type of modeling than that found in SolidWorks. That’s not to say you couldn’t model those things in SolidWorks but I think it’s fair to say you couldn’t model them easily. Modo being a sub D modeler is great at modeling organic type geometry. I’m a novice modo user. I’ve played with the rendering and animation areas of modo and gone through many of the training tutorials to get a better grasp and comfort level. I’ve never modeled anything in modo outside of a collection of basic spheres, cubes and odd shapes so; creating “water” in modo was going to be a challenge for me even though modo made this type of geometry creation easier than SolidWorks.
This is where the “Splash Kit” came in. Luxology has created some kits which speed up certain processes for the user. Currently there is a PAD kit, Splash Kit, HDRE Kit, Slik Kit and soon you’ll be seeing a SolidWorks Kit. The splash kit comes with a variety of pre defined meshes, materials, and environments that makes creating or adding liquid geometry around your model (in our case SolidWorks model) easy. I say liquid because it doesn’t have to be water. It could be milk, blood, chocolate, cola, anything really. I found some predefined splash meshes I liked, drag and dropped them into the modo scene and then resized them to better fit with the imported SolidWorks geometry. Once I had the basic geometry layout I then used some sculpting tools to fine tune the water mesh around the drive model. This was a great learning experience since modeling in modo is such a different mindset than modeling in SolidWorks. My first attempts at adjusting the mesh I wanted to move everything very precisely, having perfect intersections where geometry met and having the water mesh match perfectly with the drive mesh. In modo this “I need to move it exactly ½” mindset isn’t really necessary. It’s more of a feeling of an artist working in clay than an engineer machining something exact on the CNC. The entire process took some time as I was learning on the fly but the Splash kit includes training videos that show you how to work with the various aspects of the kit. It made the process much easier.

Once the geometry layout was complete all I really had to do was complete the rendering work. This was fairly straight forward as modo can work in a very similar fashion as Photoview 360 if you choose to do that. I used some of the predefined materials and environments included with the splash kit which is as easy as drag and drop, much like PhotoView 360. With my materials and lighting ready to go I then set up my camera view(s) which took some time. It’s not terribly difficult to do this but I found it challenging at first to move the camera into the position I was looking for. This is mainly due to the mouse controls in modo. The mouse in modo works nothing like the mouse in SolidWorks or PhotoView 360 for navigating a viewport. You need to learn the combination keyboard shortcuts and mouse buttons to effectively navigate and this was difficult for me since I’m NOT a keyboard person. The upcoming SolidWorks Kit will have a SolidWorks mouse setting which will make this easier for SolidWorks users. After using modo for a while however I did pick up the navigation controls and now it’s almost second nature when using the application.
Now that I had the camera views set I just had to do some test renders and adjust some of the render settings. Test renders are as easy as selecting the render option from the drop down menu and the render window is the same as the one found in PhotoView 360 although it does have a few added controls. Adjusting the render settings isn’t difficult but it does take some time to learn what the settings do and what values work best. Having a multicore CPU greatly helps in this area as more cores means faster render performance.
In the end I was able to utilize three tools, SolidWorks, modo and the Splash kit to achieve the idea in my head. The final image probably would have looked very different with the use of only one or two of these tools. Modo gives the SolidWorks user the ability to create more advanced renderings and animations than can be done utilizing the SolidWorks tools (Motion, PhotoView 360, PhotoWorks). Modo does have a learning curve and you do have to put forth an effort to become comfortable with the product. If higher end rendering an animation is your goal then the time spent learning modo will not be wasted. Once the future SolidWorks kit is released the tranisition from SolidWorks to modo will be easier but not automatic.
Rob

Great work Rob! I just invested in Modo 401 myself and find it very exciting to work with. I am not any good at it yet either but I am going throught the “signiture courseware” which is very good. You make the splash kit look very tempting to buy as well!
Great posting Rob. I often wish I was able to work with these tools. I am very impressed with the integration between SolidWorks and modo.
Way Cool, Rob. Nice droplets
All of us trained mechanical guys seem to have those same problems when asked to be precise in a program such as modo.
Steve
Rob, you have proven once again to be the Dali Lama of rendering. It is quite interesting to see that this type of rendering can be done effectively with products that are so easy to use and don’t break the bank. I will have to learn some more about this!
Wow… That looks great Rob. Thanks for sharing. So many cool tools for rendering available these days. Really looking forward to the release of the SolidWorks Kit for Modo.